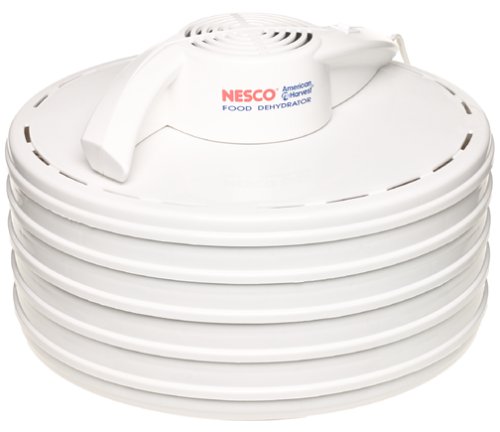
This unit features Nesco/American Harvest's innovative Top Mounted Powerhead that dries food quickly and evenly with superior results. Detaches to make dehydrator dishwasher safe for easy clean up. Fan-Flow Technology means faster, more even drying with no tray rotation necessary. Perfect for the beginner.
(Insect Repellent) - No surprise here.
Mosquitoes, ever heard of them? Around here, they are big, they are mean, and they are plentiful. Not to mention, they are stealthy, stubborn and annoying. Everyone hates that ever familiar sound of a mosquito buzzing around your head, It conjures up feelings of anxiety and, in some cases, sheer terror. I have actually fled an area before, just to avoid being their lunch. Most wooded areas stay moist during the warm months, making them the perfect habitat to breed mosquitoes. The first thing you will need to do is find a repellent that is right for you. There are many varieties of Repellent on the market, the most popular and most effective one contains a chemical called DEET, but there are other types of natural ingredient based repellents also. One common misconception about bug spray is that it is being absorbed into your blood stream, and poisoning your body. Trust me; everything you touch on a daily basis has the potential to make you deadly ill. There are probably more bacteria in your kitchen sink that are more likely to cause you harm, then any bug spray will. When used as directed, bug spray is no more harmful than any other product we apply to our skin on any given day. You just have to use your head, read the instructions thoroughly, and take into consideration things like, the length of time you are going to be outdoors, the time of year, etc. My repellent of choice is Deep Woods Off, I tend to stay out longer and sometimes hike into the evening hours, when mosquitoes are at their worst. Other considerations to keep in mind are as follows:
- Apply repellent lightly, heavy coverage does not provide you any more protection.
- Wash your hands before eating
- Do not spray the product on your face, spray it on your hands and wipe it on your face, keeping it away from your eyes and mouth.
- Check recommended usage for children. Do not let them apply it to themselves; children have a tendency to stick their hands in their mouths.
- Do not exceed the recommended usage.
- Try to keep from applying repellent to areas of broken skin or areas that have a rash.
(Footwear) - These boots are made for walking.In most cases, there are wide varieties of situations that will dictate what types of footwear you will need on your hike. If you are just going on small nature trail that has primarily smooth or flat trails, then wear what is comfortable for you. If you plan on hiking on rough, rocky or elevated trails, you might want to consider boots.
What type of boots you purchase is totally up to you, just make sure they fit before you get out on the trail and find out the hard way. One reason I prefer boots is the uneven terrain that I have come across over the years. They give me the support and traction I need when I am coming down a hillside, or hiking on a rocky trail. If you have ever hiked in the fall, then you know that the leaves can cover some of the rocks and mud, making conditions perfect for a sprained or broken ankle.
(Rain gear) - Predict the unpredictable
Weather in Southern Indiana can change faster than you can lace you boots. It is the most helpless feeling being out in the woods when a storm pops up, especially if your miles from anywhere. One thing I have with me at all times is a poncho. They sell small ones that will fit right in your pocket. You can usually pick up a pack of two for about a dollar. Trust me; it could very well be the best investment you make in this area. Some people do not like ponchos and prefer to use an umbrella. To each their own, if you wish use an umbrella, then go right ahead. A poncho can be very uncomfortable for some people and they are very hot if you have to wear them for long periods of time. Just make sure you have something with you just in case the weather turns on you. Never underestimate Mother Nature in the Midwest, it can be sunny one minute and hell on earth the next. It does not hurt to be prepared.
(Camera) - Look at the view from up here.
A camera is something I never go hiking without, it is the one tool I have with me at all times. Besides, you are going on a hike to enjoy the natural beauty of the wilderness, aren't you?
One of my favorite times to hike is in mid April, when the wildflowers are in full bloom and the under story greenery is enjoying the sun before the canopy fills in. Second, only to spring is fall, you just cannot beat the burning colors in Brown County. Whether you enjoy the winter, spring, summer or fall, Southern Indiana provides some of the most majestic backdrops for even the amateur photographer.
(Water) - cool, crisp, refreshing.
It really does not matter how long your hike is when water is concerned. You just cannot survive without it. One thing that I have realized is, no trail is an easy walk. If your not used to hiking, you will be surprised how fast you can become dehydrated. Sometimes the stimulus in the woods can distract you. The natural beauty of things can keep your mind occupied for hours. One thing people do not realize is how far they can walk when they are not thinking about walking. That is why it is a good idea to have water handy, preferably in a refillable bottle. As soon as your mind catches up with your feet, you are going to enjoy that bottle of water as if it is the last one on earth.
(G.O.R.P) - Good old raisins and peanuts
If you are planning on going on a longer hike, you may want to consider taking some kind of snack. It does not have to be raisins and peanuts, if you like chocolate, take some with you. I recommend M&M's because they do not melt all over the place. You can also take Beef Jerky, granola bars, energy bars or dried fruit.
The sky is the limit. Just remember, it is not for lunch, these types of snacks are designed to be high in protein, carbohydrates and sugar. Their main purpose is to sustain your energy level as you are hiking. I like to call it "hiking fuel". The options are endless, you can make your own trail mixes at home, if you prefer, or you can usually pick up some ready-made treats at any grocery store. If you like dried fruits or beef jerky, then you may want to invest in a food dehydrator. I recently received one as a gift, and it is worth it weight in gold.
(Hiking Stick) - Staying grounded
Hiking sticks or hiking poles, what ever you want to call them, are one of greatest assets to have on a hike. They have proven themselves worthy many times over for me. One of the best things about them is they are plentiful. As your walking along the trail, you are sure to find a limb lying around that will serve as a nice hiking stick. Have an old broom or mop? They make great hiking sticks as well. Hiking sticks can be made from just about anything you can think of. If money is no object, you may want to pick up a real set at your local outdoors shop, which is fine as well. One advantage to store bought poles is there adjustability to any person's height; they are collapsible and are extremely lightweight. Many people use them for many different tasks on the trail, they help keep you balanced when you are crossing a stream, or crossing uneven terrain. They also reduce the muscular impact on your legs, back and feet. They help me to keep low-lying branches out of my face, and if it is an early morning, I will use it to clear the spider webs that cover the trail. I even have an attachment for my camera so I can use my hiking pole as a tripod. No matter how you use them, they are a necessary tool on any hike, should you choose to use one or two poles is totally up to you. Some people hate to use two poles, other live by it.
Well, there you have it; you are now ready to enjoy yourself on your next hiking trip. I could go on forever, but I have to get out there and enjoy nature for myself.
http://sibiketrails.fateback.com
Tim Tanguay is a local trail enthusiast, who loves the outdoors. He runs a website called Southern Indiana Trails which is devoted to educating people about wildlife Conservation.
dehydrator
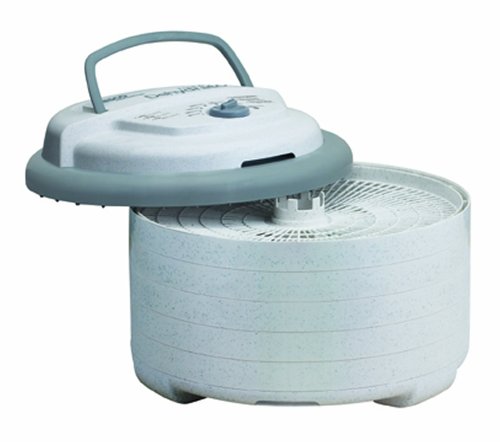 The NESCO Professional Food & Jerky Dehydrator has more power than most dehydrators -- 700 watts -- which means faster drying time. You will have results in hours, not days. The top mounted fan with patented Converga-Flow action pressurizes air downward through the outer ring and horizontally across each individual tray, converging at the center, for fast, even drying. No need to rotate trays. The adjustable thermostat allows you to dry different foods at proper temperatures (95-155 F), providing the flexibility to produce the best drying results. As your needs grow, the Professional Food & Jerky Dehydrator can be expanded up to 12 trays.

